Operations Manual
Viewing the Acquisition Module
To view the Acquisition Module, click the Acquisition then you will see its sub- modules (Currencies, Budgets, Expenses, Orders, and Suppliers).
Viewing the Currency
To view the Currency, click the Currency sub module, then you will see the list of currencies. See Figure 113 below.
Adding and Searching the Currency
- To add and create a currency, click New Currency then fill up the basic information.Then click Create to complete action See Figure 114 and 115 below.
Figure 114. Adding Currency
Figure 115. Creating Currency
- To search a currency, type keywords on the search bar then click the search icon to complete action. See Figure 116 below.
Figure 116. Searching Currency
Editing and Deleting a Currency
- To edit a currency, click the Edit (blue button) then edit the information details. Click the Update to complete action. See Figure 117 and 118 below.
Figure 117. Editing Currency
Figure 118. Editing Currency Details
- To delete a currency, click the red Delete button on the entry list, then click Yes button to complete action. See Figure 119 below.
Figure 119. Deleting Currency
Viewing the Budget
- To view the approved budget list of the user click on the Acquisition then choose the Budget sub module. You can see the list of budget in the page. See Figure 120 below.
Figure 120. Viewing the Budget
Adding and Searching the Budget
- To add a semestral budget for the user, click the New Budget on the upper right side corner of the page. Fill up the Academic Year, Description and the budget you assign for the user. Once finished, click Create to complete action.
See Figure 121 and 122 below.
Figure 121. Adding the Budget
Figure 122. Creating the Budget
- To search a budget, type key words for a specific budget, on the search bar located on the right side of the page. Click the search icon to complete action. see Figure 123 below.
Figure.123 Searching the Budget
Editing and Deleting a Budget
- To edit the budget, click the Edit button then you can edit the basic budget information. Click the Update button to complete action. See Figure 124 and 125 below.
 Figure 124. Editing the Budget
 Figure 125. Editing the Budget Details
- To delete the budget, click the red Delete button on the last column of the budget list. Click Yes to complete action. See Figure 126 below.
Adding and Searching the Budget Unit
- To add a budget unit, click the New Unit button, then fill up the location, description and the allowed budget for the user. Click the button Save Changes to complete action. See Figure 142 and 145 below.
Figure 142. Adding the Budget Unit
* To search a budget unit, type keywords on the search bar then click the search icon to complete action. See Figure 145 below.
Figure 145. Searching the Budget Unit
Editing and Deleting the Budget Unit
You can edit the budget unit details, by clicking the Quick Edit button on the right side column of the table of unit entries. Fill up the needed information then click Update to complete action. Click the Close button to exit in the dialog box. See Figure 143 below.
Figure 143. Editing the Budget Unit
- To delete a budget unit, click on the red Delete button on the right side column of the table of unit entries. Click Yes to complete action. See Figure 144 below.
Figure 144. Deleting the Budget Unit
Note: Only the Acquisition Head can add,edit and delete a semestral budget.
Viewing the Expenses
- To view the expenses, click the Expenses sub-module, then you will see the list of expenses. see Figure 146 below.
Figure 146. Viewing the Expenses
Adding and Searching the Expenses
- To add an expense, click on the Create Expense. Then fill out the basic information needed.Click Create to complete action. See Figure 147 below.
Figure 147. Adding the Expense
- To search an expense, type keywords on the search bar then click the Search Icon beside the search bar. See Figure 148 below.
Figure 148. Searching the Expense
Editing and Deleting an Expense
- To edit an expense, click the blue Edit button on the last column of the table list of expenses. See Figure 149 and 150 below.
Figure 149. Editing the Expense
Figure 150. Editing Details of the Expense
- To delete an expense , click the red Delete button on the last column of the table list of expenses. See Figure 151 below.
Figure 151. Deleting an Expense
Viewing the Orders
- To view your orders, click on the sub- module Orders, then you will see the list of order items. You can also click the View button to see the Orders details. See Figure 127 below.
Figure 127. Viewing the Orders
Searching the Orders
- To search an order from the supplier, type keywords in the search bar then click the search icon to complete action. see Figure 128 below.
Figure 128. Searching the Orders
Viewing the Supplier Information
- To view a supplier's information or details, click the blue View button. You can now see the basic information of the supplier. See Figure 129 below.
Figure 129. Viewing the Supplier Information
Searching and Adding the Orders
- To add an order, click the New Order button on the right side of the lower part of the page. see Figure 130 and 131 below.
Figure 130. Adding the Orders
Figure 131. Creating the Orders
Note: You can add a new order item if you edit details of an order's information.
Searching the Orders
* To search an order, type keywords on the search bar on the upper right side of the page. Click the Search icon to complete action. See Figure 132 below.
Figure 132. Searching the Order
Editing and Deleting an Order
- To edit an order, click on the Edit button on the last column of the table then you can start editing the basic information of an order. You can choose where Billing and Delivery Location you prefer. The number of total items and bibliographic record will also appear in this page. Click Update to complete action. See Figure 133 and 134 below.
Fig.133 Editing the Order
Fig.134 Editing The Order Details
Note: You can also close or re-open an order, just click on the button Close the Order or Reopen this Order to complete action. See Figure 152 below.
- To delete an order, click on the red Delete button located in the last column of the table. See Figure 153 below.
Figure 153. Deleting an Order
Viewing Invoice
- To view the order's invoice, click on the button Invoice, then you will see list and details of the invoices. See Figure below 154 below.
Figure 154. Viewing Invoice
Adding and Searching Invoice
- To add an invoice, click on the New Invoice button then fill up the basic information needed. Click Create to complete action. See Figure 157 and 158 below.
 Figure 158. Creating an Invoice
- To search an invoice, type keywords on the Search bar then click the Search Icon to complete action. See Figure 159 below.
Viewing the Suppliers
- To view the list of suppliers, click on the Suppliers sub module, then you will see the list of the suppliers. See figure 160 below.
Figure 160. Viewing the Suppliers
Adding and Searching the Supplier
- To add a supplier, click on the New Supplier button on the upper right side of the page. Fill up the needed information about the supplier. Click Create to complete action. See Figure 161 and 162 below.
 Figure 161. Adding the Supplier
 Figure 162. Creating the Supplier
- To search a supplier, type keywords on the search bar then click the Search Icon to complete action. See Figure 163 below.
Figure 163. Searching the Supplier
Editing and Deleting a Supplier
- To edit a supplier's information, click on the blue Edit button at the last column of the list of suppliers table. You can start editing the supplier's basic information. Click Update to complete action. See 164 and 165 below.
Figure 164. Editing the Supplier
Figure 165. Updating Details of the Supplier
- To delete a supplier, click on the red Delete button located at the last column of the supplier's table. Click Yes to complete action. See Figure 166 below.
Figure 166. Deleting the Supplier
Viewing the Circulation Module
- To view the Circulation Module. Click on the Circulation menu item on the sidebar of the page. See Figure 167 below.
Figure 167. Viewing the Circulation Module
Viewing Check- Out Transactions
- To view check-out transactions click on the Check-out sub module. You will see the list of the transactions with the patron or user. See Figure 168 below.
Searching Patrons/ User Transactions
- To search patrons/ user, type keywords on the search bar on the right side of the page. Click the Search icon to complete action. See Figure 169 below.
Figure 169. Searching User Transactions
Viewing Patron/ User Transactions
- To view the patrons/ users information click the blue View button on the last column of the table. See Figure 170 and 171 below.
- You can view check- Out and Hold Items.
 Figure 170. Viewing User Transactions
 Figure 171. Viewing User Profile
- Check Out items can be viewed in the check out basket by searching the barcode. Type the barcode of the item then you can see the details and the status and the action that has been made in the item.
Deleting Check-out Items
- To delete check out items, click the red Clear Check-out button, then click Yes to complete action. See Figure 172 below.
Figure 172. Deleting Check-Out Items
Viewing Hold Items
- To view Hold Items click on the Hold tab, then you will see the details of the hold items.
Editing User Profile
- To edit a user profile, click on the green Edit Profile button left side of the page.Click Update to complete action.
Viewing Check-In Items
- To view Check- In items, type the barcode of the item, then click “Search Barcode” to complete action.
- Items that are in the basket are showed in
- Click Check In
- To delete click “Clear Check-in basket”
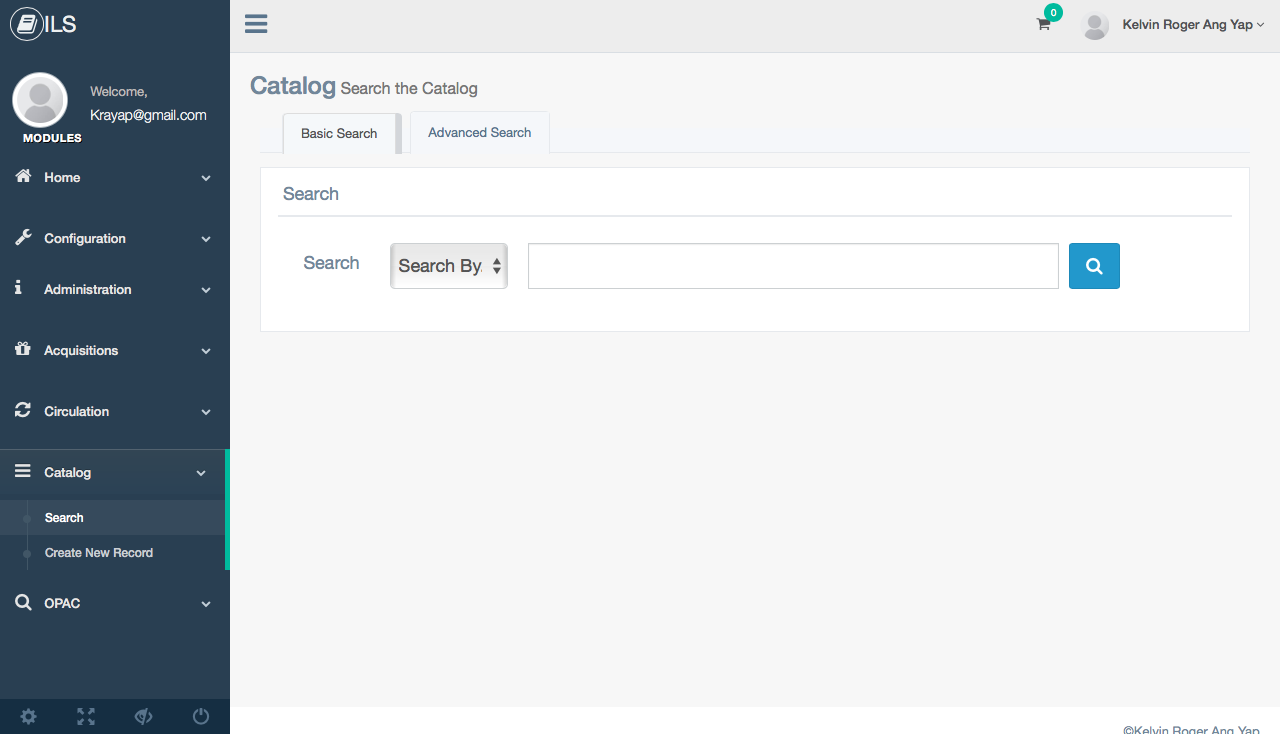
Viewing the Cataloging Module
- To view the Cataloging Module, Click on the Catalog menu item on the sidebar of the page. See Figure below.
Searching the Catalog
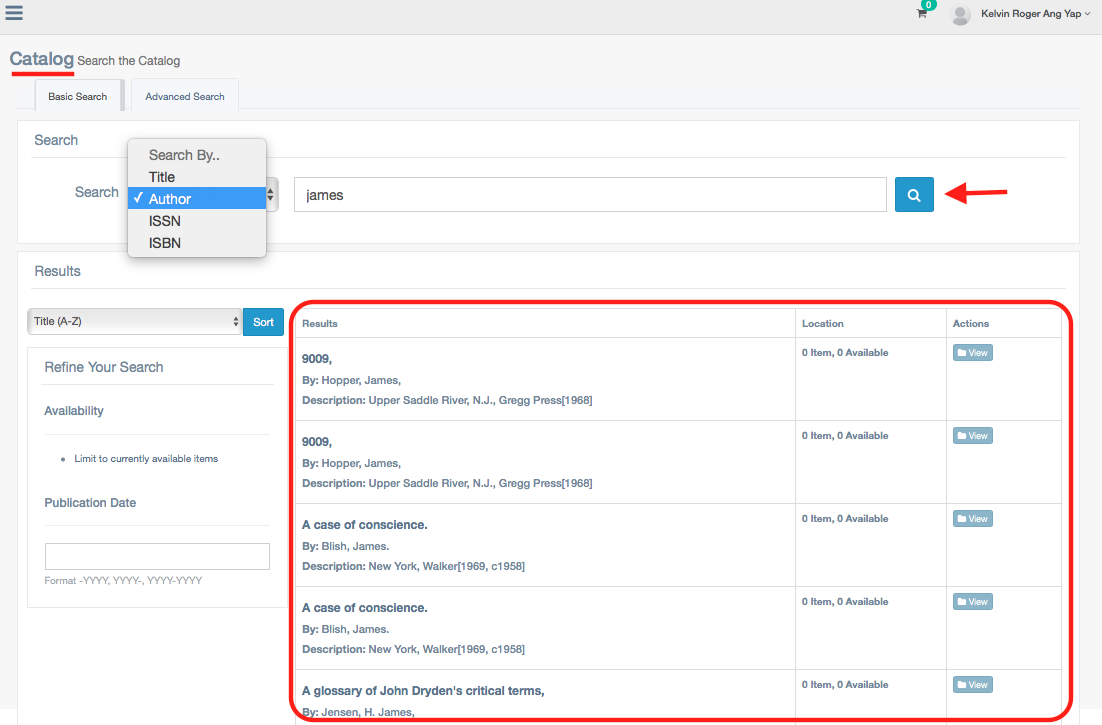
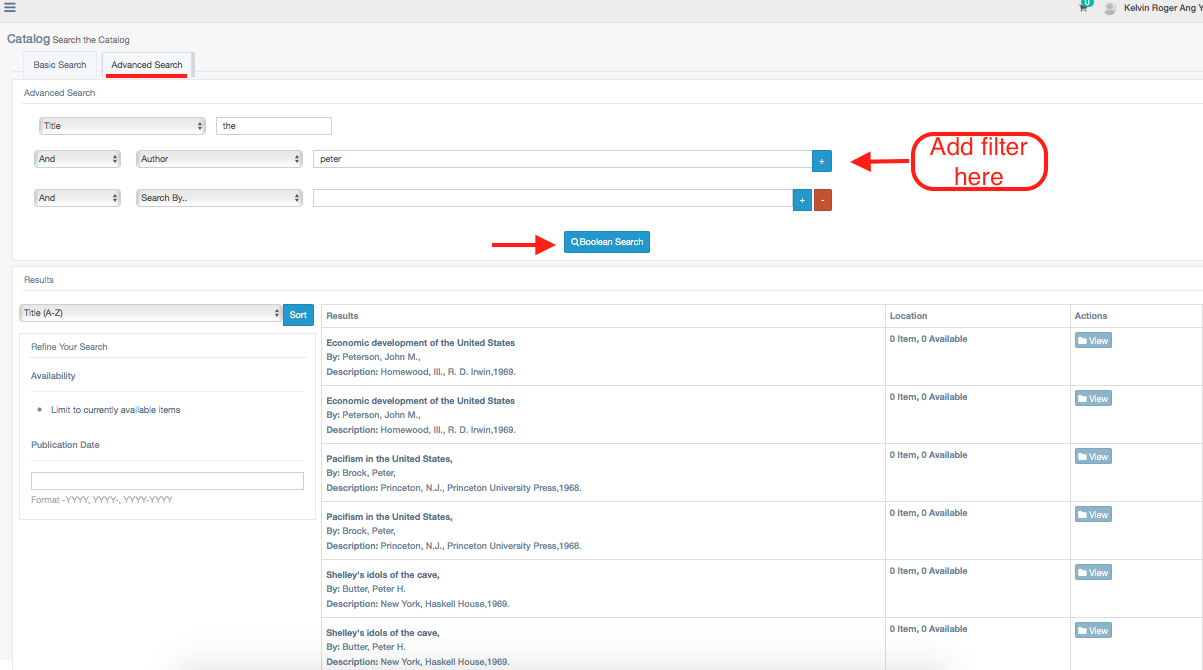
- In searching the catalog you have two ways to filter your search, the Basic Search and the Advanced Search.
- A Basic search allows you to search on limited material type.
- An Advanced Search allows you to have additional limit of your search options by language and author.
- You can add search options by clicking the Plus (+) Button.
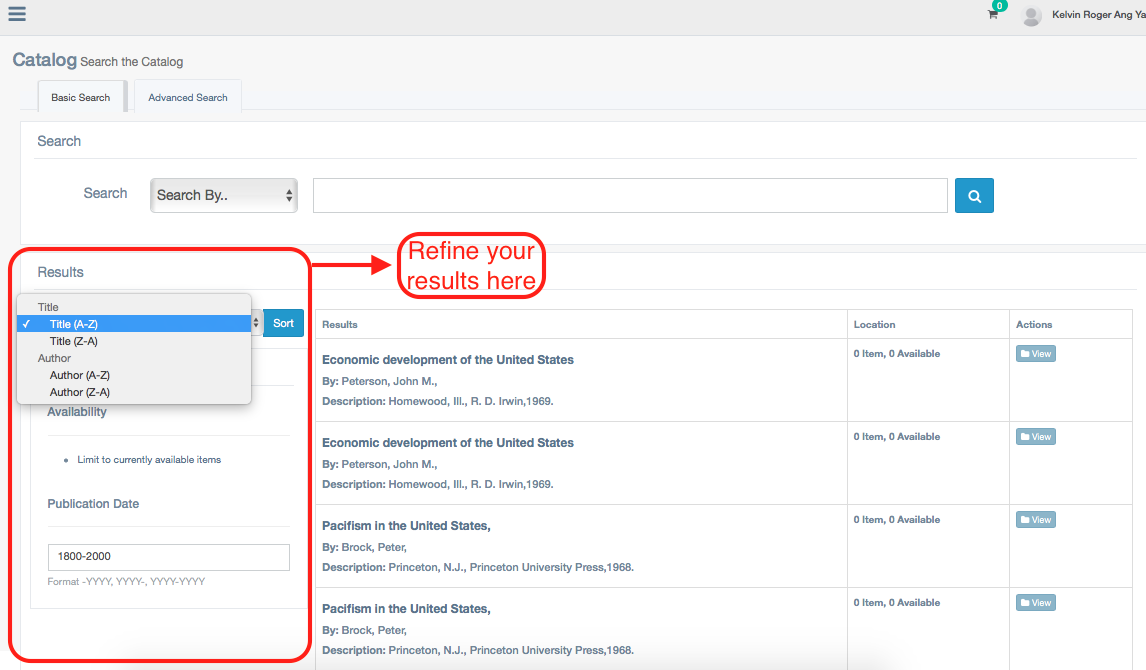
- You can also refine or customize your search on the left side bar of the page.See Figure below.
- You can sort the results from A-Z and Z-A of the title and author.
- You can refine your search results by typing your preferred publication date.
- Click Boolean Search to complete action.
Adding/ Editing New Record Manually
To create a new record, type manually the details of the items of the catalog/MARC file. You can add or delete input for the item by clicking the + button or delete button.Then click Save to complete action.
Viewing The Record Information
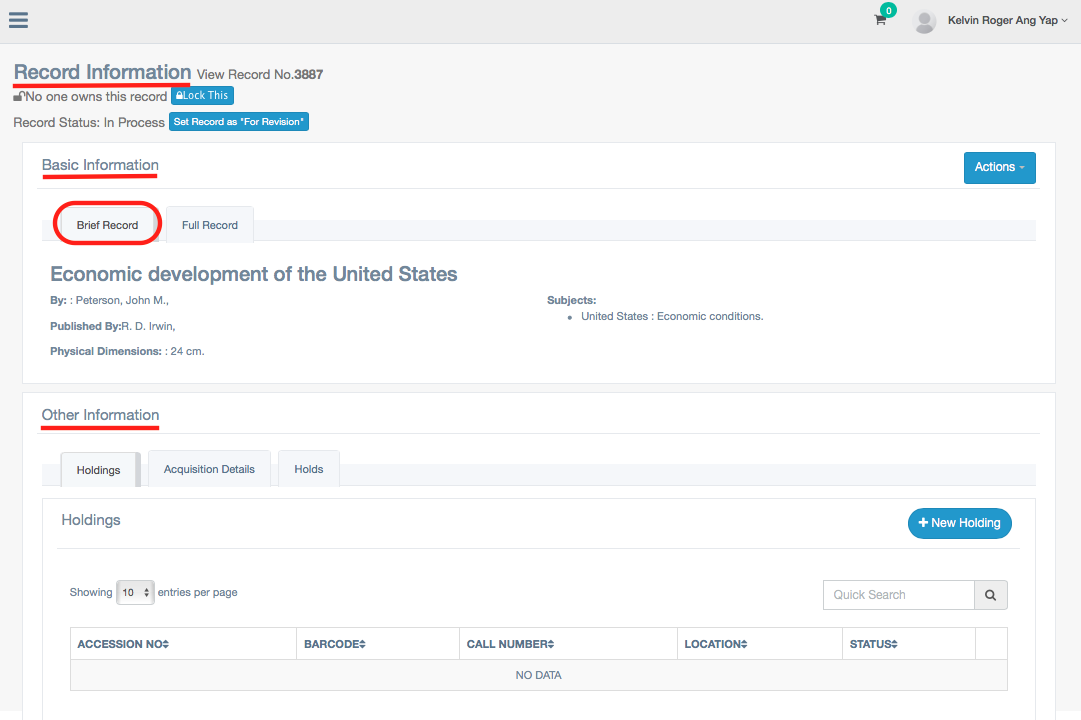
To view the record information, click the View button on the “Action” column. The Basic information has a brief record and full record.
If you click the Full record you will see the Fields and sub-fields of the record.
- You can lock the record and also set the record for revision.
Serials
Viewing the Serials Module
To view the Serials Module, click the Serials then you will see the list of subscriptions.
Adding and Searching the Serials
- To add and create a serial, click New Subscription then fill up the basic information.Then click Create to complete action
- To search a subscription, type keywords on the search bar then click the search icon to complete action. See Figure 116 below.
Editing and Deleting a Subscription
- To edit a subscription, click the Edit (blue button) then edit the information details. Click the Update to complete action.
- To delete a subscription, click the red Delete button on the entry list, then click Yes button to complete action.


